Scanning Basic Documents (iX1600/iX1500)
For details about documents that can be scanned, refer to Documents That Can Be Loaded Directly into iX1600/iX1500.
The procedure to scan documents is as follows:
-
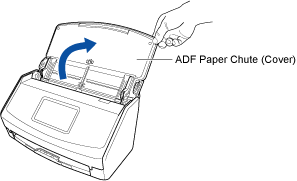
Open the ADF paper chute (cover) of iX1600 or iX1500.
-
Pull out the extension and stacker on the ADF paper chute (cover).

-
Load a document in the ADF paper chute (cover).
Load a document face-down and head-first with the back facing you (when loading multiple documents, the last page is on the top). Adjust the number of documents so that they do not go beyond
 and are kept within the side guides when they are loaded.
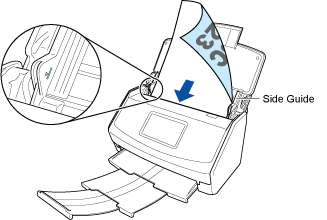 ATTENTION
Automatic image rotation is not available when scanning with ScanSnap Connect Application.
-
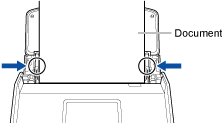
Adjust the side guides to both edges of the document.
Hold each side guide in the middle to adjust them. Otherwise, the documents may be fed skewed.
-
Perform a scan.
To scan from ScanSnap Connect Application
Tap
![[Scan] Button](../config/../images_Android/scan.png) on the [File List] screen or do the same thing on the folder screen with the ScanSnap Sync function set to on.
on the [File List] screen or do the same thing on the folder screen with the ScanSnap Sync function set to on.To scan from iX1600/iX1500
Press the [Scan] button in the home screen on the touch panel.
A message appears indicating that the file is being received.
The received file will appear on the [File List] screen or the [Files] screen.
HINTWhen [Continuous Scan] is selected for [Feed] under [Scanning] in [Profile], after scanning is complete, a message appears asking you whether to continue scanning or not.
Load documents in iX1600 or iX1500. Then, press the [Continue] button or the [Scan] button on the touch panel to continue scanning.
You can change the setting for [Feed] by pressing the feed mode setting icon in the lower right of the screen for continuing a scan on the touch panel of iX1600 or iX1500.
When you scan the following documents, select [Manual scan] for [Feed].
Documents folded in half
Envelopes
Documents with sticky notes attached
Multi-layered documents such as transfer paper
Long page documents such as long receipts
Plastic cards
To end the scan, press the [Exit] button on ScanSnap Connect Application or press the [Finish] button on the touch panel.
When you configure [Specify destination] for [Destination] in the [Profile] screen, the file is moved to the specified destination after scanning.
Because the file that is moved is not displayed in the [File List] screen or in the folder screen with the ScanSnap Sync function set to on, use another application to confirm that the image data meets your requirements.
-
When the ScanSnap Sync function is set to on, the received file is uploaded to a synced cloud service automatically if you select the [Auto Upload] checkbox in [ScanSnap Sync Setting] and an Internet connection is established.
-
Tap the received file on the [File List] screen or the [Files] screen.
The [Preview] screen appears.
-
Confirm that the image data meets your requirements.
HINT
You can send and view the received file in another application. When the ScanSnap Sync function is set to on, the received file can be uploaded to a cloud service.
The scanned data will be discarded if you exit ScanSnap Connect Application during scanning.
When a notification occurs such as an e-mail alert, alarm or power shortage, a mobile device connected to iX1600 or iX1500 will be disconnected and scanning will be canceled.
In this case, you can keep the scanned data created before the disconnection by bringing ScanSnap Connect Application active again, however, you cannot continue scanning the rest of the document.
Up to 1,000 pages can be created for a single PDF file.
Scanning using the Carrier Sheet and Photo Carrier Sheet is not available.
If you use ScanSnap Manager on your computer, use ScanSnap Manager to scan a document placed inside the Carrier Sheet. You can receive the file or download the file to your mobile device in the following procedure.
Use Scan to Mobile to receive the file
Use the ScanSnap Sync function to download the file that is saved in ScanSnap Organizer