Filling in the Captured Finger Areas in the Scanned Image of a Book
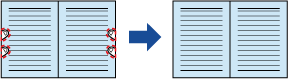
You can correct a scanned image by filling in fingers that were captured in the scanned image of a book.
The scanned image is corrected right after the document is scanned or after the scanned image is imported into ScanSnap Home.
To fill in the captured finger areas in a scanned image, the fingers need to be detected.
When you scan a book, fingers captured in a scanned image may not be detected in the following cases.
When two or more fingers that are used to hold down a book to be scanned are touching each other (Figure 1)
When you hold down a book to be scanned with manicured fingers or fingers with artificial nails (Figure 2)
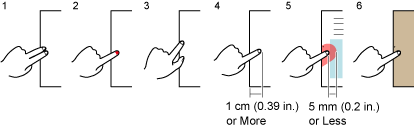
When you hold down a book to be scanned with your fingers bent (Figure 3)
When fingers that are used to hold down a book to be scanned are captured 1 cm (0.39 in.) or more (Figure 4)
When there is text or an image within 5 mm (0.2 in.) around the fingers that are used to hold down a book to be scanned (Figure 5)
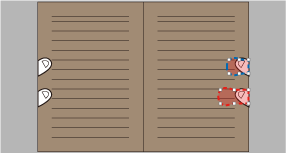
When a book that has a background color other than white (such as a comic magazine) is scanned (Figure 6)
When a book with [Gray] or [B & W] selected for [Color mode] in the scan settings is scanned
Up to five fingers on each side (top/bottom/right/left) of a scanned image can be filled in.
To prevent image deterioration, select and fill in as many fingers as possible with one operation.
-
If you correct an image in book image correction mode after editing it in point retouch mode, the corrections in point retouch mode are overridden.
Follow the procedure below to perform multiple book image corrections for one page.
Edit in book image correction mode (
 ).
).Correcting a distorted book image
Splitting a double-page spread image
Edit in point retouch mode (
 ).
).Filling in the captured fingers in image
- Display the [ScanSnap Home - Book Image Viewer] window of ScanSnap Home.
When correcting a scanned image right after a document is scanned
Scan a document.
For details about how to scan a document, refer to How to Scan Documents.
-
In the [ScanSnap Home - Image scanning and file saving] window of ScanSnap Home, select [Correct and save double-page spread document images (book/magazine)], and then click the [Check/Correct] button to display the [ScanSnap Home - Book Image Viewer] window.
When correcting a scanned image that is managed in ScanSnap Home
Display the Main Window of ScanSnap Home.
For details, refer to To Display the Main Window.
In the Content Data Record List View, select a content data record that has an image with captured fingers that you want to fill in.
Select [Open with ScanSnap Home Viewer] in the menu that appears when you right-click the content data record to display the viewer window.
Click
 on the [Correct] tab to display the [ScanSnap Home - Book Image Viewer] window.
When work data that is required for correction is attached to a scanned image, you can correct the distorted book image in book image correction mode or you can split a double-page spread image.
- Click .
-
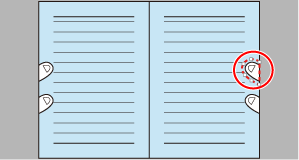
Detect the shape of the fingers that were captured in a scanned image automatically.
When the captured fingers are clicked, the outlines of fingers appears.
To adjust a range of the outline, drag the white dot on the outline.
 HINT
HINT-
If a finger captured in a scanned image is not detected, the finger outline is displayed in default format.
Drag the white points on the outline and align it with the captured finger area.
-
Fingers captured in the image are filled in and the image is saved.
-
If you correct an image in book image correction mode after editing it in point retouch mode, the corrections in point retouch mode are overridden.
Follow the procedure below to perform multiple book image corrections for one page.
Edit in book image correction mode (
 ).
).Correcting a distorted book image
Splitting a double-page spread image
Edit in point retouch mode (
 ).
).Filling in the captured fingers in image
- Display the [ScanSnap Home - Book Image Viewer] window of ScanSnap Home.
When correcting a scanned image right after a document is scanned
Scan a document.
For details about how to scan a document, refer to How to Scan Documents.
-
In the [ScanSnap Home - Image scanning and file saving] window of ScanSnap Home, select [Double-page spread (Book/Magazine)], and then click the [Check/Correct] button to display the [ScanSnap Home - Book Image Viewer] window.
When correcting a scanned image that is managed in ScanSnap Home
Display the Main Window of ScanSnap Home.
Click the [ScanSnap Home] icon
 in the application list that appears when you click Launchpad in the Dock.
In the Content Data Record List View, select a content data record that has a distorted image that you want to correct.
Select [Tools] → [Correct] in the menu that appears when you click a content data record while holding down the [control] key on the keyboard to display the [ScanSnap Home - Book Image Viewer] window.
When work data that is required for correction is attached to a scanned image, you can correct the distorted book image in book image correction mode or you can split a double-page spread image.
HINTIf [Mac (Scan to file)] is selected for [Type] in [Managing options] in the settings for a profile that is used for scanning a document, the scanned image cannot be corrected.
To modify the settings for a profile that you use when scanning a document, refer to Modifying the Settings for a Profile.
- Click .
-
Detect the shape of the fingers that were captured in a scanned image automatically.
When the captured fingers are clicked, the outlines of fingers appears.
To adjust a range of the outline, drag the white dot on the outline.
HINT-
If a finger captured in a scanned image is not detected, the finger outline is displayed in default format.
Drag the white points on the outline and align it with the captured finger area.
-
Fingers captured in the image are filled in and the image is saved.