Viewer Window (Windows)
In the ScanSnap Home viewer window, you can display and edit a scanned image. When you edit scanned images in a PDF format or JPEG format, display this window from the main window, the [Scan to Folder] window, the [Scan to Email] window, or the [Scan to Print] window. In the ScanSnap Home viewer window, you can display and edit a scanned image. When you edit scanned images in a PDF format or JPEG format, display this window from the main window.
In the viewer window, the number of scanned images that can be opened at one time is up to 50 scanned images. When a [No more data can be opened.] message appears, close the window with the unnecessary scanned images that appear.
-
The images in the content data records in the [Cloud] folder displayed when
 on the toolbar in the main window is clicked cannot be edited. In the [Cloud] folder, content data records that are saved on the ScanSnap Cloud server are displayed.
For regions where ScanSnap Cloud can be used, refer to here.
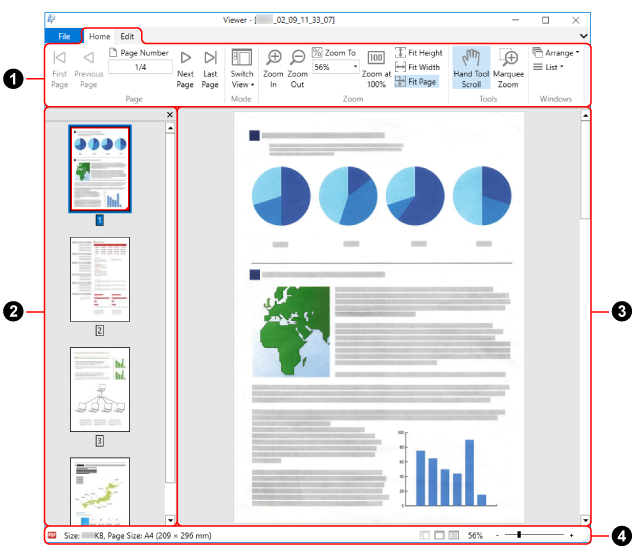
Window that is displayed from the main window
- [File] tab
Displays the file menu.
The file menu contains the following items.
- Save
-
Appears when the viewer window is displayed from the main window.
Overwrites the scanned images.
- Save as
-
Appears when the viewer window is displayed from the main window.
Saves the scanned images as a file with another name.
- Save all to finish
-
Appears when the viewer window is displayed from the [Scan to Folder] Window, the [Scan to Email] Window, or the [Scan to Print] window.
Saves all the images and closes the viewer window.
-
Appears when the viewer window is displayed from the main window.
Prints the displayed image with a printer.
- Close
-
Appears when the viewer window is displayed from the main window.
Closes the displayed image.
- Exit
Closes the ScanSnap Home viewer window.
- Ribbon (
 )
) Displays the functions of the ScanSnap Home viewer window categorized in the tabs that are listed below.
[Home] tab
[Edit] tab
[Correct] tab
Even when work data that is required for correction is not attached to a scanned image, the following can be performed.
Filing in the captured fingers in an image in point retouch mode
Removing the newspaper background color
- [Home] tab
-
Item
Name
Function

First Page
Displays the first page.

Previous Page
Displays the previous page.


Page Number
Displays a page specified in the page number field.

Next Page
Displays the next page.

Last Page
Displays the last page.

Switch View
Switches the view mode for the viewer window.
 Show all (Pages Panel and page view)
Displays the Pages Panel and the page.
 Show the page only
Displays the page only.
 Show Pages Panel
Displays the Pages Panel only.
Clicking
 switches the view mode.
Click [Switch View] to display the submenu.

Zoom In
Magnifies the page.

Zoom Out
Shrinks the page.


Zoom To
Zooms to the specified scaling.

Zoom at 100%
Displays the page with a scale of 100%.

Fit Height
Fits the page to the window height.

Fit Width
Fits the page to the window width.

Fit Page
Fits the whole page to the window size.

Hand Tool Scroll
Drags the magnified page to view a different area.

Marquee Zoom
Zooms in the selected area of the page.
Dragging the mouse on the page magnifies the selected area.
Left-clicking on the page magnifies it according to the predetermined magnification levels.
To shrink the selected area, drag the mouse or left-click on the page while holding down the [Ctrl] key.

Arrange
Arranges multiple active windows in the following ways.
Cascade
Vertical
Horizontal
Clicking
switches the window arrangement.Clicking
 displayed next to [Arrange] displays the submenu.
List
Lists multiple open windows. You can specify which window to make active (display on top).
- [Edit] tab
-
Item
Name
Function

Undo
Undoes the most recent action such as the following:
Cutting a page
Pasting a page
Inserting a page
Deleting a page
Rotating a page
Moving a page
Cropping a page
Deskewing a page
Merging pages
Making a correction
Removing the newspaper background color

Cut
Cuts the selected page.

Copy
Copies the selected page.

Paste
Pastes the cut or copied page.

Insert Page
Inserts a page from another image.
Appears when the viewer window is displayed from the main window.

Delete Page
Deletes the selected page.

Rotate 90° CCW
Rotates the selected page 90 degrees counterclockwise.

Rotate 180°
Rotates the selected page 180 degrees.

Rotate 90° CW
Rotates the selected page 90 degrees clockwise.

Deskew
Deskews the selected page.

Crop
Crops the selected page.

Merge Pages
Merges two pages together in a specified way to create a new page.
Appears when the viewer window is displayed from the main window.
Vertically
Horizontally

Select All
Selects all the pages.

Select displayed page only
Selects the displayed page only.
- [Correct] tab
-
Item
Name
Function

Correct
Opens Book Image Viewer in which you can correct a distorted image, split a page, or fill in the captured finger areas in the scanned image.

Removing the newspaper background color
White out the background on a scanned newspaper image to make the characters stand out.
- Pages Panel (
 )
) PDF file and JPEG file images are displayed as thumbnails.
The Pages Panel and page view together form a [window].
- Page view (
 )
) Displays a page selected in the Pages Panel.
The Pages Panel and page view together form a [window].
- Status bar (
 )
) Displays the following information. In [Status Bar Configuration] that appears when you right-click the status bar, you can change the displayed information.
File format (icon indicating a PDF or JPEG file)
 (text mark)
Appears when the displayed page is searchable.
 (PDF/A mark)
Appears when the scanned image is in a PDF format that conforms to PDF/A-1b.
 (lock mark)
Appears when the scanned image is in a password-protected PDF format.
 (digital signature mark)
Appears when the scanned image is in a PDF format that bears a digital signature.
File information (Date created, File size, Page size)
Switch View button
Zoom (page magnification)
Zoom Slider