Scanning Documents Such as Photographs and Clippings
When photographs are scanned with the Carrier Sheet, the document type is not detected as photographs. Therefore, the scanned images may not be saved in a specified cloud storage service. In such a case, tap [Always save to same service] in the [Select cloud storage services] screen to specify a cloud storage service.
-
Check that the [Scan/Stop] button on the ScanSnap is lit in purple.
-
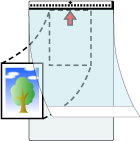
Place the document inside the Carrier Sheet.
Open the Carrier Sheet and place the top of the document against the top center of the Carrier Sheet.
-
Insert the part with the black and white pattern straight into the feeding section of the ScanSnap, with the front side of the Carrier Sheet facing up.
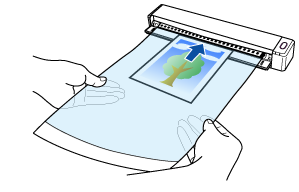
The Carrier Sheet is pulled in until it is set inside the ScanSnap.
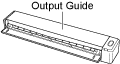
HINTIf you perform a scan using the Carrier Sheet with the output guide open, a paper jam occurs. Make sure to close the output guide when you perform a scan using the Carrier Sheet.
-
Press the [Scan/Stop] button on the ScanSnap (for three seconds or longer) until the button flashes in blue to scan the document.
HINT
Repeat steps 2 and 3 to scan more documents such as photographs and clippings.
-
Press the [Scan/Stop] button on the ScanSnap to finish scanning.
The [Scan/Stop] button flashes in blue while the scanned image is being sent to the ScanSnap Cloud service.
When the scanned image has been sent, the [Scan/Stop] button lights up in purple again.
A new scan history is added to the scan history list of the ScanSnap Cloud application by updating the list. For details about the scan history list, refer to Main Screen.
HINTWhen a scanned image is sent to the ScanSnap Cloud service or saved in a cloud storage service, a push notification is sent to your mobile device.
-
On a cloud storage service that supports the scanned document type, check the scanned image to make sure the document was scanned properly.
Scanned images can be checked on the Detail View Screen of the ScanSnap Cloud application.
HINTIf the scanned image is not saved in a specified cloud storage service, the document type for the scanned document may have been detected incorrectly. In such a case, the scanned image can be transferred to another cloud storage service. For details, refer to Transferring a Scanned Image to Another Cloud Storage Service.
If it is difficult to do so, disable the detection of the document type and specify one cloud storage service. Scanned images will always be saved in the specified cloud storage service, regardless of the document type. For details, refer to [Select cloud storage services] Screen.
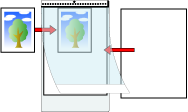
In the following cases, place a blank (white) sheet of paper underneath the document when scanning:
Shadows appear around the edges of the scanned image
Black lines appear around the edges of a uniquely shaped cutting
If the first document has been scanned and another document is inserted in the ScanSnap right after, the document will be scanned as a photograph or clipping.