Scanning Documents with iX100 by Inserting the Next Document While the Current Document Is Being Scanned
When ScanSnap Connect Application is used to scan small size documents such as business cards and postcards with iX100, you can insert the next document while the current document is being scanned. These scanning methods are referred to as dual scans.
For details about documents that can be scanned, refer to Documents That Can Be Loaded Directly into iX100.
When you select an option other than [Auto] for [Paper] in the [Profile] window, the dual scan function is disabled.
Use a dual scan to scan a document within the following ranges. If one of the following ranges is exceeded, a length error occurs and part of the document may not appear in the scanned image.
Maximum scanning length (356 mm (14 in.) per sheet): 863 mm (34 in.)
Maximum number of documents for scanning: 20 sheets
When you continue scanning by inserting the next document while the current document is being scanned, the [Scan/Stop] button flashes more quickly if the scanning length exceeds 650 mm (26 in.). If this occurs, wait until scanning is complete without continuing to insert more documents. After scanning is complete, insert the next document. The next scan is started automatically.
-
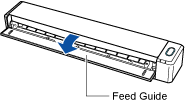
Open the feed guide of iX100.
 HINT
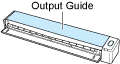
HINTIf you want the document to be ejected from the front of iX100 or when there is not enough space at the back of iX100 to allow the document to be completely ejected, open the output guide.
For details about documents that can be scanned with the output guide open, refer to Documents That Can Be Loaded Directly into iX100.
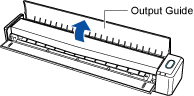
How the document is ejected differs as below depending on whether the output guide is open or closed.
When the output guide is closed

When the output guide is open

The [Scan/Stop] button flashes in blue. The button returns to being lit normally when document scanning is enabled.
-
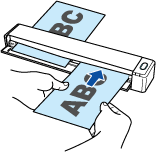
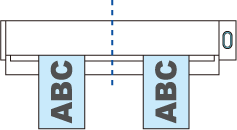
Insert the document straight into the feeding section of iX100, with the scanning side facing up.
Insert each document in the center of the left or right half of the feeding section.
The document is pulled in until it is set inside iX100.
ATTENTIONWhen inserting the documents, insert them at least 10 mm (0.39 in.) apart from each other. If the space between the documents is less than 10 mm (0.39 in.), the scanned images may not be cropped correctly.
When you perform scanning with the output guide closed, leave enough space at the back of iX100 to allow the document to be completely ejected.
Make sure that the area where the document is ejected from iX100 is clear of any obstacles. Otherwise, paper jam may occur.
If you scan the following documents with the output guide open, a paper jam may occur and damage the documents. Scan the following documents with the output guide closed.
Thick paper (80 g/m2 [20 lb] or heavier)
Postcards
Business cards
Automatic image rotation is not available when scanning with ScanSnap Connect Application.
-
Perform a scan.
To scan from ScanSnap Connect Application
Tap the [Scan] button on the [File List] screen or do the same thing on the folder screen with the ScanSnap Sync function set to on.
To scan from iX100
Press the [Scan/Stop] button on iX100.
A message appears indicating that the file is being received.
The received file will appear on the [File List] screen or the [Files] screen.
HINTWhen [Continuous Scan] is selected for [Feed] under [Scanning] in [Profile], after scanning is complete, a message appears asking you whether to continue scanning or not.
By inserting a document in iX100, you can continue scanning.
To end the scan, tap the [Exit] button, or press the [Scan/Stop] button on iX100.
To save the received file in the photo album, set [Save to photo album] to on (in the [File format] screen from [Profile]).
In the photo album, confirm that the image data meets your requirements.
To save the received file in the Files app, set [Save to the Files app] to on (in the [File format] screen from [Profile]).
In the Files app, confirm that the image data meets your requirements.
When the ScanSnap Sync function is set to on, the received file is uploaded to a synced cloud service automatically if you set [Auto Upload] to on in [ScanSnap Sync Setting] and an Internet connection is established.
-
Tap the received file on the [File List] screen or the [Files] screen.
The [Preview] screen appears.
-
Confirm that the image data meets your requirements.
If it does not meet the requirements, connect the computer with iX100, scan the document, and then get or download the file in the following procedure.
Use Scan to Mobile to receive the file
Use the ScanSnap Sync function to download the file that is saved in ScanSnap Organizer
HINTYou can send and view the received file in another application. When the ScanSnap Sync function is set to on, the received file can be uploaded to a cloud service. After the received file is uploaded to a cloud service, the file can be used in ScanSnap Organizer on a computer that is synced with the cloud service or used on other mobile devices.
The scanned data will be discarded if you exit ScanSnap Connect Application during scanning.
When a notification occurs such as an e-mail alert, alarm or power shortage, a mobile device connected to iX100 will be disconnected and scanning will be canceled.
In this case, you can keep the scanned data created before the disconnection, however, you cannot continue scanning the rest of the document.
Up to 1,000 pages can be created for a single PDF file.
Long page scanning is not available by using ScanSnap Connect Application.
If you use ScanSnap Manager on your computer, scan a long page document with ScanSnap Manager. You can receive the file or download the file to your mobile device in the following procedure.
Use Scan to Mobile to receive the file
Use the ScanSnap Sync function to download the file that is saved in ScanSnap Organizer
Do not close the application while receiving a file. Doing so may slow down the next startup because the [File List] screen or the folder screen with the ScanSnap Sync function set to on takes time to reload.