Creating a Searchable PDF File
Up to 500 pages (one page per searchable PDF file) can be created per month. You can check the number of pages that have been created in the [Account information] window.
To open the [Account information] window, click [ScanSnap Cloud] in the menu bar and then select [Account Settings]
-
From the menu bar, click [ScanSnap Cloud] → [Preferences].
The ScanSnap Cloud settings window appears.
-
Click the [Scan settings] tab.
When the [Configure save destination for each document type] checkbox is selected, select the type of document for which a searchable PDF file is created.
-
From the [File format] pop-up menu, select [PDF] or [PDF (Create per page)].
-
Click the [Details] button.
The PDF detailed settings window appears.
- Select the [Convert to Searchable PDF] checkbox.
-
From the [Target language] pop-up menu, select the language for text recognition.
- Click the [Close] button to close the PDF detailed settings window.
-
Click
 .
.
-
Check that the [Scan/Stop] button on the ScanSnap is lit in purple.
-
Insert the document straight into the feeding section of the ScanSnap, with the first page facing up.
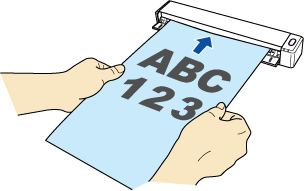
The document is pulled in until it is set inside the ScanSnap.
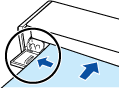
ATTENTIONIf you specify a standard size instead of selecting [Auto] (default) for [Document size] in the ScanSnap Cloud settings window (the [Scan settings] tab), insert the document by aligning it with the left edge of the feeding section.
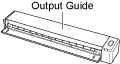
When you perform scanning with the output guide closed, leave enough space at the back of the ScanSnap to allow the document to be completely ejected.
Make sure that the area where the document exits the scanner is clear of any obstacles. Otherwise, a paper jam may occur.
If you scan the following documents with the output guide open, a paper jam may occur and damage the documents. Scan the following documents with the output guide closed.
Thick paper (80 g/m2 [20 lb] or heavier)
Postcards
Business cards
Plastic cards
Carrier Sheets
-
Press the [Scan/Stop] button on the ScanSnap and scan the document.
After scanning is complete, insert the next document to be scanned.
When the document is inserted, scanning starts automatically.
-
Press the [Scan/Stop] button on the ScanSnap to finish scanning.
The [Scan/Stop] button flashes in blue while the scanned image is being sent to the ScanSnap Cloud service.
When the scanned image has been sent, the [Scan/Stop] button lights up in purple again.
A new scan history is added to the scan history list of the ScanSnap Cloud application by updating the list. For details about the scan history list, refer to Main Window.
HINTWhen a scanned image is saved in a cloud storage service, a notification is sent to your computer.
-
On a cloud storage service that supports the scanned document type, check the scanned image to make sure the document was scanned properly.
Scanned images can also be checked in the preview area of the ScanSnap Cloud application.
HINTIf the scanned image is not saved in a specified cloud storage service, the document type for the scanned document may have been detected incorrectly. In such a case, the scanned image can be transferred to another cloud storage service. For details, refer to Transferring a Scanned Image to Another Cloud Storage Service.
If it is difficult to do so, disable the detection of the document type and specify one cloud storage service. Scanned images will always be saved in the specified cloud storage service, regardless of the document type. For details, refer to ScanSnap Cloud Settings Window ([Scan settings] Tab).