Scanning Documents, Business Cards, or Receipts
For details about documents that can be scanned, refer to here in the ScanSnap Help.
-
If you are loading multiple sheets, check the number of sheets.
The maximum number of sheets in the ScanSnap is as follows:
For A4 or smaller sizes: Up to 50 sheets can be loaded (with paper weight of 80 g/m2 [20 lb] and thickness of the document stack under 5 mm [0.2 in.])
ATTENTIONIf you try to scan more than the maximum amount that can be loaded, the following problems may occur:
Files cannot be properly created due to excessive file size
Paper jams occur during scanning
-
Fan the documents.
Hold both ends of the documents and fan them a few times.
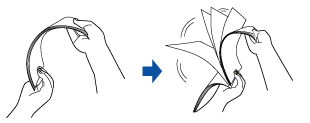
Rotate the documents 90 degrees and fan them in the same manner.
-
Straighten the edges of the documents and slightly displace the top edges at an angle.
 ATTENTION
Paper jams or damage to documents may occur if you scan the documents without aligning the edges first.
-
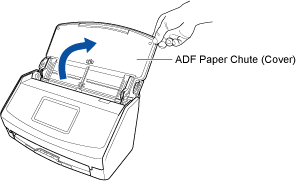
Open the ADF paper chute (cover) of the ScanSnap to turn it on.
-
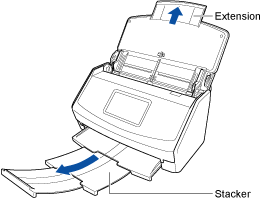
Pull out the extension and the stacker on the ADF paper chute (cover).
- On the home screen on the touch panel, select [Scan to Cloud] from the profile list.
If a user icon is displayed in the upper left of the touch panel, press the user icon to display the [Selecting a User] screen and select [All cloud users].
-
Check that the feed mode setting icon is
 .
.
If the feed mode setting icon is
 or
or  , press the icon to display the [Feed mode setting] screen and change the feed mode on the screen.
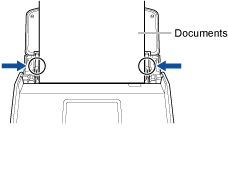
 - Load the document in the ADF paper chute (cover).
Load the document face-down and head-first with the back facing you (when loading multiple documents, the last page is on the top). Adjust the number of documents so that they do not go beyond
 within the side guides when they are loaded.
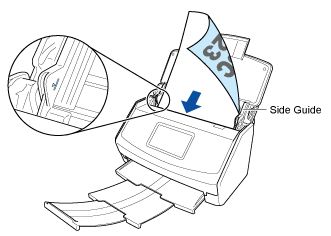
-
Align the side guides with both ends of the document.
Hold each side guide in the middle to adjust them. Otherwise, the documents may be fed skewed.
- Press the [Scan] button on the home screen on the touch panel to scan the document.
A new scan history is added to the scan history list of the ScanSnap Cloud application by updating the list. For details about the scan history list, refer to Main Screen.
HINTWhen a scanned image is sent to the ScanSnap Cloud service or saved in a cloud storage service, a push notification is sent to your mobile device.
-
On a cloud storage service that supports the scanned document type, check the scanned image to make sure the document was scanned properly.
Scanned images can be checked on the Detail View Screen of the ScanSnap Cloud application.
HINTIf the scanned image is not saved in a specified cloud storage service, the document type for the scanned document may have been detected incorrectly. In such a case, the scanned image can be transferred to another cloud storage service. For details, refer to Transferring a Scanned Image to Another Cloud Storage Service.
If it is difficult to do so, disable the detection of the document type and specify one cloud storage service. Scanned images will always be saved in the specified cloud storage service, regardless of the document type. For details, refer to [Select cloud storage services] Screen.