Scanning Documents (S1300i)
You can scan documents such as handouts for meetings or business cards.
For details about documents that can be scanned, refer to Documents to Scan (S1300i).
- If you are loading multiple sheets, check the number of sheets.
The maximum number of sheets in the ScanSnap is as follows:
For A4 or smaller sizes: Up to 10 sheets can be loaded (with paper weight of 80 g/m2 [20 lb] and thickness of the document stack under 1 mm [0.04 in.]).
ATTENTIONIf you try to scan more than the maximum amount that can be loaded, the following problems may occur:
- Files cannot be properly created due to excessive file size.
- Paper jams occur during scanning.
- Fan the documents.
- Hold both ends of the documents and fan them a few times.

- Rotate the documents 90 degrees and fan them in the same manner.
- Hold both ends of the documents and fan them a few times.
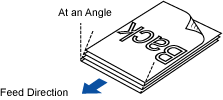
- Straighten the edges of the documents and slightly displace the top edges at an angle.
 ATTENTION
Paper jams or damage to documents may occur if you scan the documents without aligning the edges first.
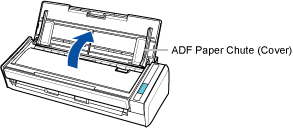
- Open the ADF paper chute (cover) of the ScanSnap.
- The [Scan] button flashes in blue. The button returns to being lit normally when document scanning is enabled.
In addition, the ScanSnap Manager icon in the notification area located at the far right of the taskbar changes from
 to
to  .
.
- The [Scan] button flashes in blue. The button returns to being lit normally when document scanning is enabled.
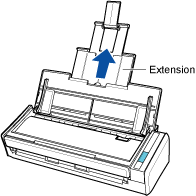
- Pull out the extension.
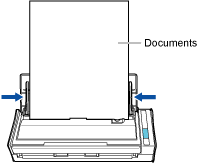
- Load the documents in the ADF paper chute (cover).
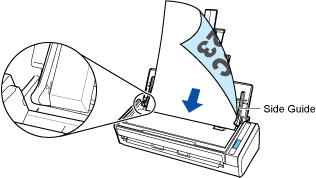
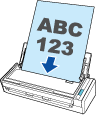
Load the document face-down and head-first with the back facing you (when loading multiple documents, the last page is on the top). Adjust the number of documents so that they do not go beyond the reference marks and are kept within the side guides when they are loaded.
 ATTENTION
When the [Place document face up] checkbox is selected in the [Scanning mode option] window, load the documents face-up and bottom edge down.
To open the [Scanning mode option] window, click the [Option] button in the [Scanning] tab of the ScanSnap Setup Window.
- Adjust the side guides to the width of the documents.
Hold each side guide in the middle to adjust them. Otherwise, the documents may be fed skewed.
- Press the [Scan] button on the ScanSnap to start a scan.ATTENTION
Do not perform the following operations during scanning. Doing so will stop scanning.
- Connect or disconnect the ScanSnap and other USB devices.
- Close the ADF paper chute (cover).
- Switch users.
- Allow the computer to enter sleep mode.
- The [Scan] button on the ScanSnap flashes in blue while the documents are being scanned.
The [ScanSnap Manager - Image scanning and file saving] window appears.
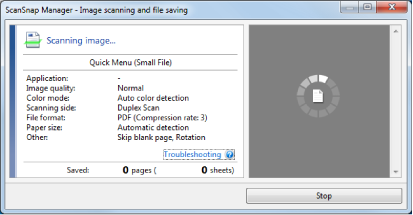
- The Quick Menu appears when the scanning is completed.
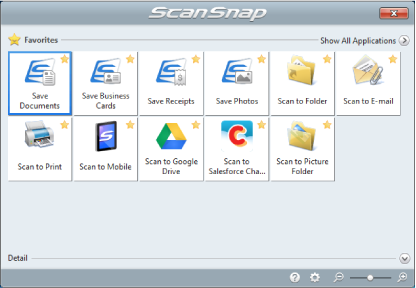
- In the Quick Menu, click the icon of the application to link with ScanSnap Manager.
For details about linking the following applications with ScanSnap Manager, refer to Useful Usages.
- Save Documents
- Save Business Cards
- Save Receipts
- Save Photos
HINTThe following applications are displayed in the Quick Menu when ScanSnap Organizer and CardMinder are installed.
- When ScanSnap Organizer is installed
ScanSnap Organizer
- When CardMinder is installed
Scan to CardMinder
- The selected application starts up. For details, refer to the Advanced Operation Guide.
ATTENTION- You cannot start scanning when the Quick Menu is displayed. Either select an icon from the Quick Menu and finish the process, or close the Quick Menu before you perform the next scan.
- Do not move, delete, or rename scanned images using other applications while the Quick Menu is displayed.
HINT- Clicking
 displays the description of an application. Placing the mouse cursor over the icon of another application displays the description of the application.
 - Performing a scan while an application that can be automatically linked with is active automatically starts the linkage between ScanSnap Manager and the application.
For details, refer to the Advanced Operation Guide.