Scanning Documents Larger Than A4 or Letter Size by Directly Inserting Them in the ScanSnap (iX100)
By folding an A3, B4, or Double Letter size document in half and scanning each side continuously, the scanned images of both sides are automatically merged and saved as a single image.
For details about documents that can be scanned, refer to Documents to Scan (iX100).
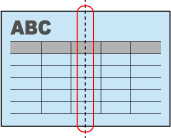
- Scanned images are automatically merged only when there is text, diagram, or a table on the fold line of the folded document.
- When scanned images are automatically merged
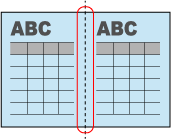
- When scanned images are not automatically merged
- When scanned images are automatically merged
- After a document is scanned, if the scanned images are not merged automatically, you can use the ScanSnap Organizer Merge Pages function to merge the scanned images.
For details, refer to the ScanSnap Organizer Help.
- For a document that will have scanned images which are not merged automatically, you can use the optional Carrier Sheet to scan the document and merge the scanned images automatically.
For details, refer to Scanning Documents Larger than A4 or Letter Size with the Carrier Sheet (iX100).
- If scanned images are unexpectedly merged, clear the [Merge both side images] checkbox on the [Scanning mode option] window, and then scan the document again.
To open the [Scanning mode option] window, click the [Option] button in the [Scanning] tab of the ScanSnap Setup Window.
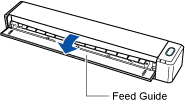
- Open the feed guide of the ScanSnap.
- The [Scan/Stop] button flashes in blue. The button returns to being lit normally when document scanning is enabled.
In addition, the ScanSnap Manager icon in the notification area located at the far right of the taskbar changes from
 to
to  .
.
- The [Scan/Stop] button flashes in blue. The button returns to being lit normally when document scanning is enabled.
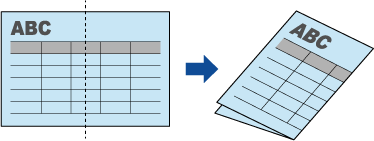
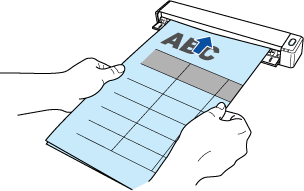
- Fold the document in half so that the sides to be scanned are facing out.ATTENTION
Fold the long side of the document in half. If the left and right areas of the folded document are different in size from each other, the scanned images may not be merged automatically.
- Insert the document straight into the feeding section of the ScanSnap, with the scanning side facing up.
- The document is pulled in until it is set inside the ScanSnap.
HINTIf you scan a document folded in half with the output guide open, a paper jam may occur. Make sure to close the output guide when you scan a document folded in half.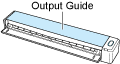
- Press the [Scan/Stop] button on the ScanSnap to start scanning.
- The [Scan/Stop] button on the ScanSnap flashes in blue and the [ScanSnap Manager - Image scanning and file saving] window appears while the document is being scanned.
When scanning is complete, the scanned image of the scanning side is displayed in the preview area.
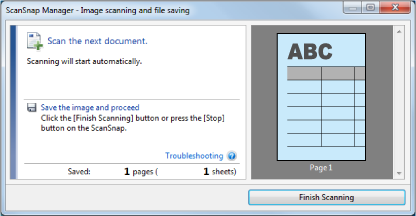
- The [Scan/Stop] button on the ScanSnap flashes in blue and the [ScanSnap Manager - Image scanning and file saving] window appears while the document is being scanned.
- Turn over the document and insert it as described in step 3.ATTENTION
Make sure to scan the front and back sides of the document folded in half consecutively.
- Scanning starts automatically.
HINTRepeat steps 2 to 5 to continue scanning more A3, B4, or Double Letter size documents. You can also continue scanning documents smaller than A4 or Letter size.
For details about how to perform a scan, refer to Scanning Documents (iX100).
- Press the [Scan/Stop] button on the ScanSnap to finish scanning.
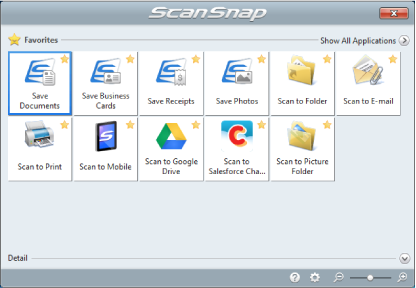
- The Quick Menu appears.
- In the Quick Menu, click the icon of the application to link with ScanSnap Manager.
When you select [Save Documents], you can manage scanned images by folder with ScanSnap Home.
For details, refer to Managing Paper Documents by Folder on a Computer with ScanSnap Home.
HINT[ScanSnap Organizer] is displayed in the Quick Menu when ScanSnap Organizer is installed.
To manage scanned images by folder with ScanSnap Organizer, refer to Managing Paper Documents by Folder on a Computer with ScanSnap Organizer.
- The selected application starts up. For details, refer to the Advanced Operation Guide.
ATTENTION- You cannot start scanning when the Quick Menu is displayed. Either select an icon from the Quick Menu and finish the process, or close the Quick Menu before you perform the next scan.
- Do not move, delete, or rename scanned images using other applications while the Quick Menu is displayed.
HINT- Clicking
 displays the description of an application. Placing the mouse cursor over the icon of another application displays the description of the application.
 - Performing a scan while an application that can be automatically linked with is active automatically starts the linkage between ScanSnap Manager and the application.
For details, refer to the Advanced Operation Guide.