How to Configure Scan Settings
- Right-click the ScanSnap Manager icon
 in the notification area located at the far right of the task bar, and from the Right-Click Menu, select one of the following to display the ScanSnap setup window.
- Scanning using the Quick Menu or profile:
Select [Scan Button Settings].
- Scanning using ScanSnap Folder:
Select [ScanSnap Folder Settings].
- The ScanSnap setup window appears.
- Scanning using the Quick Menu or profile:
- Configure the scan settings in each tab.
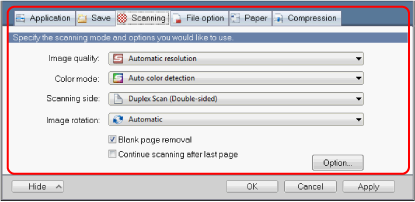
For details about each tab, refer to the ScanSnap Manager Help.
- Click the [OK] or [Apply] button.
- Scan settings are changed.
- When you use the Quick Menu, scan settings for the [Customize] button are changed.
- When you use a profile, scan settings for the currently selected profile are changed.
HINTIf you press the [Scan] button on the ScanSnap while the ScanSnap setup window is displayed, the ScanSnap setup window closes and scanning starts. Scan settings that you have changed are saved and documents are scanned by these settings.
Note that when other windows are open, these windows are not closed and scanning does not start even if you press the [Scan] button on the ScanSnap.
- Scan settings are changed.
- When you connect SV600 and another ScanSnap to a computer, you can change the settings for each ScanSnap. For details, refer to When Two ScanSnaps Are Connected to a Computer (SV600).
- You can also open the ScanSnap setup window by the following ways. If the "ScanSnap Folder" folder is opened, the ScanSnap setup window for ScanSnap Folder appears.
- Double-click the ScanSnap Manager icon .
- Press [Ctrl], [Shift], and [Space] keys simultaneously.
- Select from the [Start] menu.
- Windows 10
Select [Start] menu → [ScanSnap Manager] → [ScanSnap Manager settings].
- Windows 8.1
Click
 on the lower left side of the Start screen, and select [ScanSnap Manager] → [ScanSnap Manager settings] on the All apps screen.
 - Windows 7
Select [Start] menu → [All Programs] → [ScanSnap Manager] → [ScanSnap Manager settings].
- Windows 10
- Double-click the ScanSnap Manager icon