Scanning Multi-Page Documents Such as Receipts
Note that, if [Name files automatically] is set in the [File name] tab, each page of a document is saved as a separate scanned image.
For details about documents that can be scanned, refer to Documents That Can Be Loaded Directly into the ScanSnap.
In some cloud storage services, multi-page documents such as receipts cannot be saved as a single scanned image.
If this is the case, save each document as a separate scanned image.
For details about how to perform scanning, refer to Scanning Documents, Business Cards, or Receipts.
-
From the menu bar, click [Tool] → [Options].
The ScanSnap Cloud settings window appears.
- Click the [Scan settings] tab.
- Clear the [Configure save destination for each document type] checkbox.
-
Click the [Change] button in [Linked destination].
The [ScanSnap Cloud - Select Service] window appears.
- Select a cloud storage service that supports receipts, and click the [Select] button.
-
Select [PDF] from the [File format] drop-down list, and click the [OK] button.
-
Check that the [Scan] button on the ScanSnap is lit in purple.
-
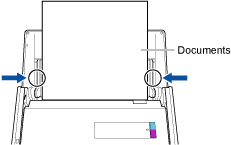
Load the documents in the ADF paper chute (cover).
Load the documents face-down and top-first with their back facing you. Adjust the number of documents so that they do not go beyond the reference marks and are kept within the side guides when they are loaded.
 ATTENTION
Do not leave more than 50 sheets (80 g/m2 or 20 lb) of ejected documents on the stacker.
-
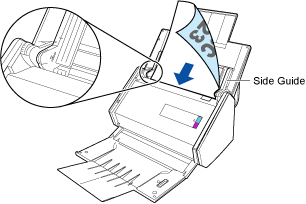
Adjust the side guides to the width of the documents.
Hold each side guide in the middle to adjust them. Otherwise, the documents may be fed skewed.
-
Press the [Scan] button on the ScanSnap and scan the document.
The [Scan] button flashes in blue while the scanned image is being sent to the ScanSnap Cloud service.
When the scanned image has been sent, the [Scan] button lights up in purple again.
A new scan history is added to the scan history list of the ScanSnap Cloud application by updating the list. For details about the scan history list, refer to Main Window.
HINTWhen a scanned image is saved in a cloud storage service, a notification is sent to your computer.
-
On a cloud storage service that supports the scanned document type, check the scanned image to make sure the document was scanned properly.
Scanned images can also be checked in the preview area of the ScanSnap Cloud application.