Cleaning the Inside of the ScanSnap (iX500)
As a guideline, the inside of the ScanSnap should be cleaned every 1,000 sheets scanned. Note that this guideline varies depending on the types of documents you scan. For instance, it may be necessary to clean the scanner more frequently when you scan documents on which the toner is not sufficiently fused.

Before cleaning the ScanSnap, you must turn off the ScanSnap and unplug the power cable from the AC outlet. Not doing so may cause fire or electrical shock.
Do not place internal parts such as the brake roller and the pick roller within reach of small children. Doing so may cause injury.
When the ScanSnap is operating, the internal glass surface will be hot.
Before you clean the inside of the ScanSnap, you must unplug the power cable from the AC outlet and leave the ScanSnap for 15 minutes or more.

Do not use aerosol spray or spray that contains alcohol to clean the scanner. Paper dust and other dust blown up by strong air from the spray may enter the inside of the scanner which may cause scanner failure or malfunction.
Also note that sparks generated by static electricity may cause a fire.
Do not use water or mild detergent to clean the inside of the ScanSnap.
It may take a long time for Cleaner F1 to dry if an excessive amount is used. Moisten the cloth with moderate quantity.
Wipe off the cleaner completely to leave no residue on the cleaned parts.
The number of sheets scanned with the ScanSnap can be checked in the window of ScanSnap Home or ScanSnap Manager on your computer.
For details, refer to the following:
When using ScanSnap Home
ScanSnap Help
https://scansnap.com/m/
When using ScanSnap Manager
ScanSnap Basic Operation Guide
-
Clean the following items:
Brake roller
Idler roller
Glass
Pick roller
Ultrasonic sensor
Unplug the power cable from the AC outlet.
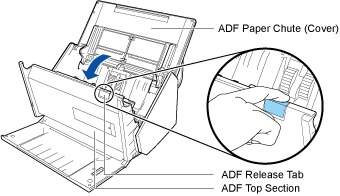
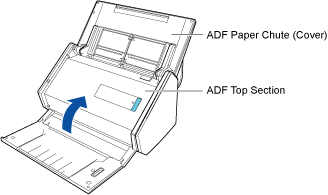
Pull the ADF release tab to open the ADF top section.
Clean the following locations with a cloth moistened with Cleaner F1.
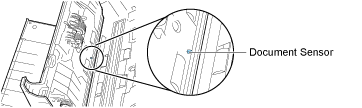
ATTENTIONWhen cleaning, be careful not to damage the document sensor with a cloth.
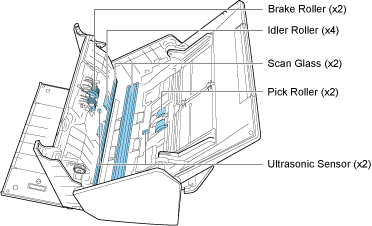
Brake roller (× 2)
Remove the brake rollers from the ScanSnap to clean them.
For details about how to remove the brake rollers, refer to Replacing Consumables (iX500).
Gently wipe off the dirt and dust along the grooves on the roller surface. Be careful not to damage the surface of the rollers.
Idler roller (× 4)
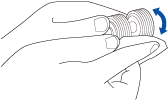
Gently wipe the dirt and dust off the rollers as you rotate them manually. Be careful not to damage the surface of the rollers. Make sure that they are cleaned properly because residue on the rollers will affect the feeding performance.
Glass (× 2)
Wipe the dirt and dust off the surface of the glass sections.
HINTIf there are any sticky substances such as glue on the glass sections, remove it by wiping the glass sections carefully.
If dirt remains, vertical streaks may appear in a scanned image.
Pick roller (× 2)
Gently wipe off the dirt and dust along the grooves on the surface of rollers as you manually rotate them downward. Be careful not to damage the surface of the rollers. Make sure that they are cleaned properly because residue on the rollers will affect the feeding performance.
Ultrasonic sensor (× 2)
Gently wipe the dirt and dust off the surface of the ultrasonic sensor. If it is difficult to clean the ultrasonic sensor, use cotton swabs.
-
Clean the feed rollers and eject rollers.
Connect the power cable to the AC outlet and press the [Scan] button for three seconds with the ADF top section open.
ATTENTIONConnect the power cable to the AC outlet only when cleaning the feed rollers and eject rollers.
Clean the following locations with a cloth moistened with Cleaner F1.
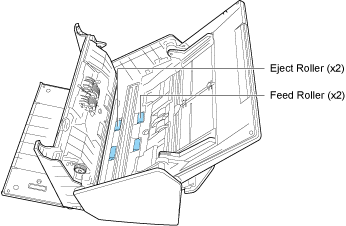
Feed roller (× 2)/eject roller (× 2)
Press the [Scan] button to rotate the rollers. Gently wipe the dirt and dust off while taking care not to damage the surface of each roller. Make sure that they are cleaned properly because residue on the rollers will affect the feeding performance.
HINTPressing the [Scan] button seven times will rotate the feed rollers and the eject rollers one revolution.
-
Close the ADF top section.
It clicks when it returns to its original position.
ATTENTIONMake sure that the ADF top section is completely closed.
Otherwise, paper jams or other feeding errors, or image faults may occur.