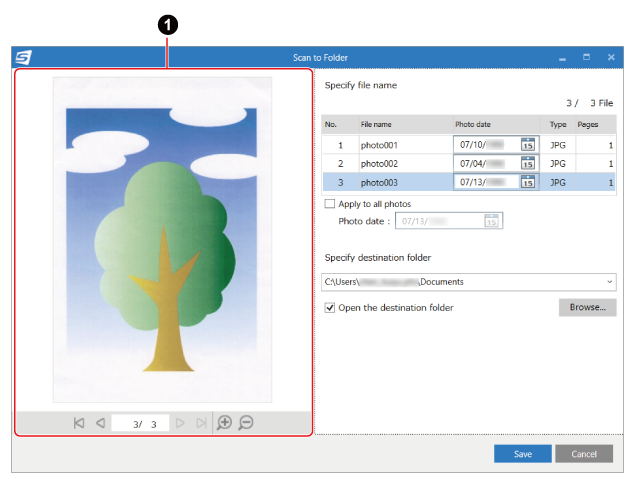
[Scan to Folder] Window
You can specify a title that is used for saving images created from the documents that you scanned as a content data record and specify a folder for the save destination in the [Scan to Folder] window.
Also, you can check images to change the orientation of pages, remove unnecessary pages, or display the viewer window of ScanSnap Home to edit an image before saving it.
The [Scan to Folder] window is displayed in any of the following cases:
Selecting [Scan to Folder] in the Quick Menu
Scanning a document by using a profile in which [Scan to Folder] is set for [Send to] in [Application] in the [Edit profiles] Window.
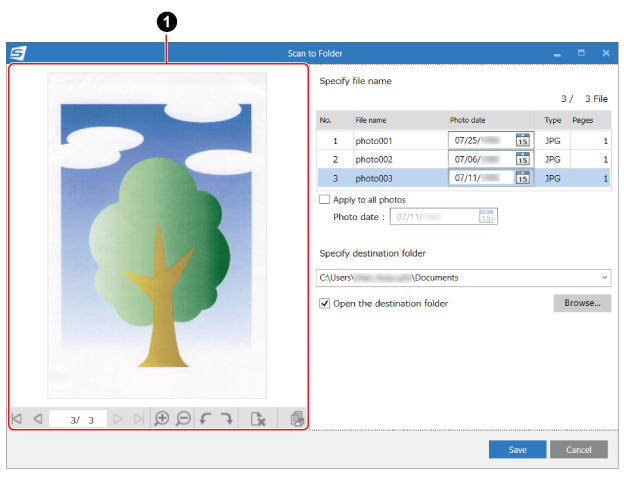
- Preview (
 )
) The image created from the document that you scanned is displayed.

-
Displays the first page.
When multiple content data records are displayed in [Specify a title] or [Specify file name], the first page of the content data record that is listed in the top of [Specify a title] or [Specify file name] is displayed.

-
Displays the previous page.
When multiple content data records are displayed in [Specify a title] or [Specify file name], the pages of all the content data records can be displayed in order.

-
Specify the page number from the total page numbers of all the content data records that are displayed in [Specify a title] or [Specify file name].

-
Displays the next page.
When multiple content data records are displayed in [Specify a title] or [Specify file name], the pages of all the content data records can be displayed in order.

-
Displays the last page.
When multiple content data records are displayed in [Specify a title] or [Specify file name], the last page of the content data record that is listed in the bottom of [Specify a title] or [Specify file name] is displayed.

Magnifies the page.

Shrinks the page.

Deletes the selected page.

Rotates the selected page 90 degrees counterclockwise.

Rotates the selected page 90 degrees clockwise.

Displays images of the content data record selected in [Specify a title] or [Specify file name] in the viewer window.
If you display the viewer window from the [Scan to Folder] window, some functions become unavailable.
The operations that are available are as follows:
- Specify a title/Specify file name
Displays the title, photo date, image file format, and number of pages of a content data record to be saved as a file in the specified folder. You can change the title of a content data record, specify the date a photo was taken, or switch the content data record to be displayed in Preview.
The image file format is displayed when [PC (Scan to file)] is selected for [Type] in [Managing options] in the settings for a profile used for scanning a document.
- X/X Content data records or X/X File
Displays the "current content data record/total content data records".
- Title/File name
Displays the title of a content data record to be saved as a file in the specified folder. You can change the title by entering a new title directly in the input field.
Also, if
 is displayed next to the input field for [Title] or [File name], you can select a title to change from the list that appears when you click .
- Photo date
The date a photo was taken is displayed in the following cases:
When there is a content data record whose document type is [Photos] and image data format is JPEG
The [Apply to all photos] checkbox is cleared
The date a photo was taken is automatically set by extracting the date printed on the photo.
Note that recognition accuracy for an extracted date depends on the color and font of the printed date. For details, refer to Differences in Recognition Accuracy of Text to Be Extracted as a Photo Date.
HINTThe following models support the function for extracting the date printed on a photo.
ScanSnap iX1600
ScanSnap iX1500
ScanSnap iX1400
ScanSnap iX1300
ScanSnap iX100
If the date displayed is different from the date printed on the photo, or if the date is blank, enter the date in the input field or select the date from the calendar that appears when you click
 .
.The [Photo date] is also set as the date the photo was taken in the Exif information (*1).
*1: "Exif" is a collection of data where the date a photo was taken and camera settings are recorded.
- [Apply to all photos] checkbox
-
The [Apply to all photos] checkbox is displayed when there is a content data record whose document type is [Photos] and image data format is JPEG.
Select this checkbox to set the same date for all content data records as the [Photo date] when there are multiple content data records whose document type is [Photos].
- Photo date
This is available when the [Apply to all photos] checkbox is selected. Enter the date in the input field or select the date from the calendar that appears when you click
.
- Specify destination folder
Displays a path of a folder where scanned images are to be saved.
To change the save destination, enter the path of a folder or click the [Browse] button.
If
is displayed next to the input field for [Specify destination folder], you can select the folder where scanned images are to be saved from the list that appears when you click .- [Browse] button
In the [Select a folder] window, you can select a folder where scanned images are saved.
- [Open the destination folder] checkbox
-
Selecting this checkbox displays the destination folder of a scanned image after it is saved.
The destination folder which will be displayed varies depending on the setting for [Type] in [Managing options] in the profile that you used for scanning a document.
When PC (Manage in ScanSnap Home) is selected
Starts up ScanSnap Home.
Note that File Explorer starts up if you specify a folder other than the [ScanSnap Home] folder managed in ScanSnap Home, in [Save to].
The location of the [ScanSnap Home] folder can be checked in [ScanSnap Home folder] in the [General] tab of the preferences window.
To display the preferences window, select [Settings] → [Preferences] from the menu on the main window.
When PC (Scan to file) is selected
File Explorer starts up.
- [Save] button
Saves the scanned images according to the settings configured in this window.
- [Cancel] button
Cancels the settings and returns to the Quick Menu (when the Quick Menu is used).
Cancels the settings and displays a message to confirm whether or not to delete the scanned images (when the Quick Menu is not used).
If you did not delete the scanned images and when the [Open the destination folder] checkbox is selected, the save destination of the scanned images is displayed.
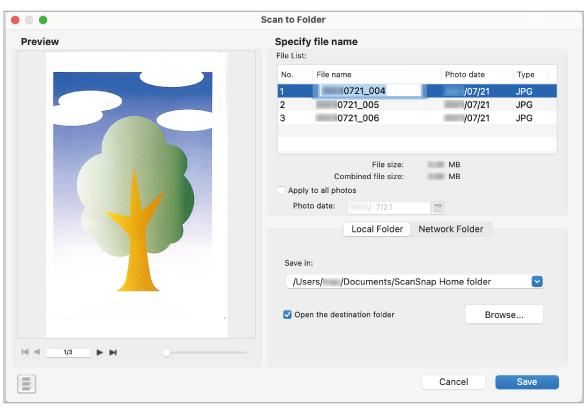
- Preview
The image created from the document that you scanned is displayed.

-
Displays the first page.
When multiple content data records are displayed in [Specify a title] or [Specify file name], the first page of the content data record that is listed in the top of [Specify a title] or [Specify file name] is displayed.

-
Displays the previous page.
When multiple content data records are displayed in [Specify a title] or [Specify file name], the pages of all the content data records can be displayed in order.

-
Specify the page number from the total page numbers of all the content data records that are displayed in [Specify a title] or [Specify file name].

-
Displays the next page.
When multiple content data records are displayed in [Specify a title] or [Specify file name], the pages of all the content data records can be displayed in order.

-
Displays the last page.
When multiple content data records are displayed in [Specify a title] or [Specify file name], the last page of the content data record that is listed in the bottom of [Specify a title] or [Specify file name] is displayed.

Rotates the selected page 90 degrees counterclockwise.

Rotates the selected page 90 degrees clockwise.

Deletes the selected page.

Zooms in or out the displayed image according to the predefined magnification levels.
Move the slider knob to the right to zoom in, and to the left to zoom out.
- Specify a title/Specify file name
-
- Content data record list/File List
Displays the title, photo date, and image file format of a content data record to be saved as a file in the specified folder. You can change the title of a content data record, specify the date a photo was taken, or switch the content data record to be displayed in Preview.
The image file format is displayed when [Mac (Scan to file)] is selected for [Type] in [Managing options] in the settings for a profile used for scanning a document.
- Title/File name
Displays the title of a content data record to be saved as a file in the specified folder. You can change the title by entering a new title directly in the input field.
Also, if
is displayed next to the input field for [Title] or [File name], you can select a title to change from the list that appears when you click .- Photo date
The date a photo was taken is displayed in the following cases:
When there is a content data record whose document type is [Photos] and image data format is JPEG
The [Apply to all photos] checkbox is cleared
The date a photo was taken is automatically set by extracting the date printed on the photo.
Note that recognition accuracy for an extracted date depends on the color and font of the printed date. For details, refer to Differences in Recognition Accuracy of Text to Be Extracted as a Photo Date.
HINTThe following models support the function for extracting the date printed on a photo.
ScanSnap iX1600
ScanSnap iX1500
ScanSnap iX1400
ScanSnap iX1300
ScanSnap iX100
If the date displayed is different from the date printed on the photo, or if the date is blank, enter the date in the input field.
The [Photo date] is also set as the date the photo was taken in the Exif information (*1).
*1: "Exif" is a collection of data where the date a photo was taken and camera settings are recorded.
- Size of a content data record/File size
Displays the file size of scanned images in a current content data record.
- Size of all content data records/Combined file size
Displays the total file size of scanned images in content data records that are to be saved.
- [Recalculate] button
Enabled when a scanned image in a content data record is being edited.
Recalculates the file size of scanned images in content data records.
- [Apply to all photos] checkbox
-
The [Apply to all photos] checkbox is displayed when there is a content data record whose document type is [Photos] and image data format is JPEG.
Select this checkbox to set the same date for all content data records as the [Photo date] when there are multiple content data records whose document type is [Photos].
- Photo date
This is available when the [Apply to all photos] checkbox is selected. Enter the date in the input field or select the date from the calendar that appears when you click
 .
.
- [Local Folder] tab
Specify a local folder for the save destination of scanned images.
- Save in
Displays a path of a folder where scanned images are to be saved.
To change the save destination, enter the path of a folder or click the [Browse] button.
If
is displayed next to the input field for [Save in], you can select the folder where scanned images are to be saved from the list that appears when you click .- [Browse] button
In the window for selecting a folder, you can select a folder where scanned images are saved.
- [Open the destination folder] checkbox
-
Selecting this checkbox displays the destination folder of a scanned image after it is saved.
The destination folder which will be displayed varies depending on the setting for [Type] in [Managing options] in the profile that you used for scanning a document.
When Mac (Manage in ScanSnap Home) is selected
Starts up ScanSnap Home.
Note that Finder starts up if you specify a folder other than the [ScanSnap Home] folder managed in ScanSnap Home, in [Save to].
The location of the [ScanSnap Home] folder can be checked in [ScanSnap Home folder] in the [General] tab of the preferences window.
To display the preferences window, select [ScanSnap Home] → [Preferences] in the menu bar.
When Mac (Scan to file) is selected
Finder starts up.
- [Network Folder] tab
Specify a network folder for the save destination of scanned images.
- Server address
Enter the network server address as follows.
afp://(ServerName) or smb://(ServerName)
- [Connect] button
Click this button to connect to the server of the address specified for [Server address].
You can specify the destination folder by typing in the folder path or clicking the [Browse] button.
- Save in
Displays a path of a folder where scanned images are to be saved.
To change the save destination, enter the path of a folder or click the [Browse] button.
If
is displayed next to the input field for [Save in], you can select the folder where scanned images are to be saved from the list that appears when you click .- [Browse] button
In the window for selecting a folder, you can select a folder where scanned images are saved.
- [Open the destination folder] checkbox
-
Selecting this checkbox displays the destination folder of a scanned image after it is saved.
The destination folder which will be displayed varies depending on the setting for [Type] in [Managing options] in the profile that you used for scanning a document.
When Mac (Manage in ScanSnap Home) is selected
Starts up ScanSnap Home.
Note that Finder is displayed if you specify a folder other than the [ScanSnap Home] folder managed in ScanSnap Home, in [Save to].
The location of the [ScanSnap Home] folder can be checked in [ScanSnap Home folder] in the [General] tab of the preferences window.
To display the preferences window, select [ScanSnap Home] → [Preferences] in the menu bar.
When Mac (Scan to file) is selected
Finder starts up.

Shows or hides the thumbnails.
- [Cancel] button
Cancels the settings and returns to the Quick Menu (when the Quick Menu is used).
Cancels the settings and displays a message to confirm whether or not to delete the scanned images (when the Quick Menu is not used).
If you did not delete the scanned images and when the [Open the destination folder] checkbox is selected, the save destination of the scanned images is displayed.
- [Save] button
Saves the scanned images according to the settings configured in this window.