Parts and Functions
This section explains the names and functions of the ScanSnap parts.
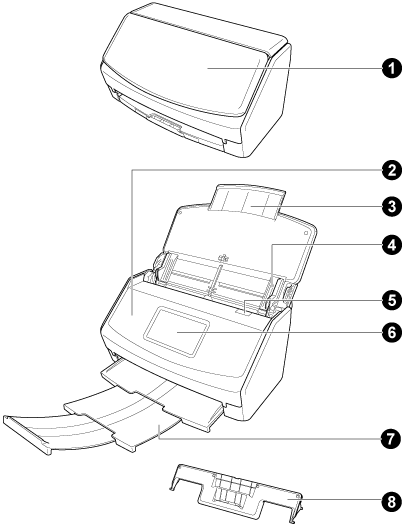
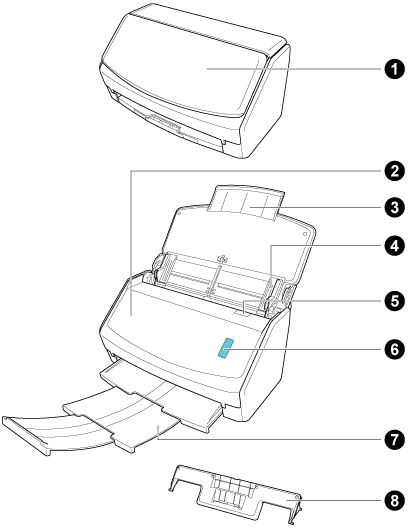
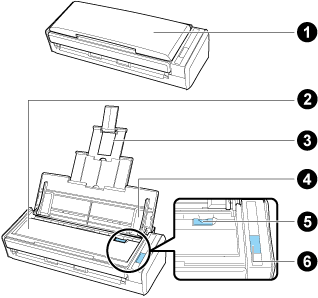
Front


No. |
Name |
Description |
|---|---|---|
|
ADF paper chute (cover) Feed guide |
Open it to use the ScanSnap. Open it to perform a scan with U-turn Scan. Opening it turns on the ScanSnap. Then, you can load a document on it. When the ScanSnap is turned off automatically, close the ADF paper chute (cover) and open it up again to turn it back on. When the ScanSnap is turned off automatically, close the feed guide and open it up again to turn it back on. |
|
[Scan] button |
Turns on the ScanSnap. Starts and finishes scanning documents. Indicates the status of the ScanSnap. Blue (lit): Ready Blue (flashing): Scanning Orange (flashing): Error Purple (lit): Using ScanSnap Cloud When you establish a link with a cloud service by using ScanSnap Cloud, refer to The Status of the ScanSnap When Using ScanSnap Cloud. For regions where a cloud service linkage is available, refer to here. |
|
Wi-Fi indicator |
Indicates the status of the Wi-Fi connection of the ScanSnap. Blue (lit): Connected (Access Point Connect mode) Blue (flashing): Standby Green (lit): Connected (Direct Connect mode) Orange (lit): Not Connectable or waiting for connection in Direct Connect mode Orange (flashing): Not Connectable (WPS error) Purple (lit): Using ScanSnap Cloud When you establish a link with a cloud service by using ScanSnap Cloud, refer to The Status of the ScanSnap When Using ScanSnap Cloud. For regions where a cloud service linkage is available, refer to here. |
|
Manual feeder |
Insert a document into the manual feeder when you scan it with Return Scan. |
|
|
ADF top section |
Open it to remove jammed documents, replace the consumable (Roller Set), or clean the inside of the ScanSnap. Open it to remove jammed documents, replace the consumable (pick roller or pad unit), or clean the inside of the ScanSnap. |
|
|
Extension |
Pull out when scanning long documents. When the ADF paper chute (cover) is opened, it will rise automatically. It holds documents loaded in the ADF paper chute (cover) when you scan documents with U-turn Scan. If the documents go outside the range of the extension, pull out the top end of the extension manually. |
|
|
Side guide |
Adjust to the width of documents to prevent them from getting skewed. |
|
|
ADF release tab |
Pull this tab to open the ADF top section. |
|
Output guide |
Open it to eject documents from the front of the ScanSnap. Select an ejection method depending on the document type you are scanning. For details, refer to Documents That Can Be Scanned with the ScanSnap.
|
|
Top cover |
Open it to remove jammed documents or clean the inside of the ScanSnap. |
|
Touch panel |
Used to display the connection status of the ScanSnap, select a profile to start scanning, or change the settings of the ScanSnap. When the ScanSnap is turned off automatically, press the touch panel to turn it back on. |
|
Head |
- |
|
Neck |
- |
|
|
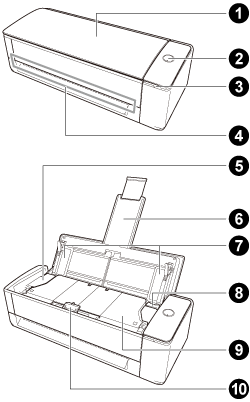
[Scan] button [Scan] button [Scan/Stop] button |
Starts scanning documents. It can be pressed even when the stacker is closed. Starts scanning documents. Starts and finishes scanning documents. Turns on the ScanSnap. Starts scanning documents. When the ScanSnap is turned off automatically, press the [Scan] button to turn it back on. When the ScanSnap is turned off automatically, press the [Scan] button to turn it back on. When the ScanSnap is turned off automatically, press the [Scan/Stop] button to turn it back on. When the ScanSnap is turned off automatically, press the [Scan] button or [Stop] button to turn it back on. Indicates the status of the ScanSnap. Blue (lit): Ready Blue (flashing): Scanning Orange (flashing): Error Purple (lit): Using ScanSnap Cloud When you establish a link with a cloud service by using ScanSnap Cloud, refer to The Status of the ScanSnap When Using ScanSnap Cloud. For regions where a cloud service linkage is available, refer to here. |
|
[Stop] button |
Turns on the ScanSnap. Finishes scanning documents. When the ScanSnap is turned off automatically, press the [Scan] button or [Stop] button to turn it back on. |
|
Base |
- |
|
Power LED |
Indicates the status of the ScanSnap as follows: Blue (lit): Ready Blue (flashing): Scanning Orange (flashing): Error |
|
White sheet |
Used to determine the starting position for scanning documents and is also the standard color reference for the color of documents when documents are scanned. |
|
Centering mark |
When placing a book or standard size document, align the center of the document with the centering mark. |
|
Battery indicator |
Indicates the remaining battery power and battery charging status.
|
|
|
Wi-Fi indicator |
Indicates the status of the Wi-Fi connection of the ScanSnap. Blue (lit): Ready Blue (flashing): Standby Orange (lit): Not Connectable Orange (flashing): Not Connectable (WPS error) Purple (lit): Using ScanSnap Cloud When you establish a link with a cloud service by using ScanSnap Cloud, refer to The Status of the ScanSnap When Using ScanSnap Cloud. For regions where a cloud service linkage is available, refer to here. |
|
Wi-Fi indicator |
Indicates the status of the Wi-Fi connection of the ScanSnap. Blue (lit): Connected (Access Point Connect mode) Blue (flashing): Standby Green (lit): Connected (Direct Connect mode) Orange (lit): Not Connectable or waiting for connection in Direct Connect mode Orange (flashing): Not Connectable (WPS error) Purple (lit): Using ScanSnap Cloud When you establish a link with a cloud service by using ScanSnap Cloud, refer to The Status of the ScanSnap When Using ScanSnap Cloud. For regions where a cloud service linkage is available, refer to here. |
|
|
Stacker |
Pull it out to use it. Open to use the stacker. It stacks up the ejected documents. When you scan documents with U-turn Scan, the ejected documents stack up on the stacker. The stacker rises and the top part extends automatically when documents are scanned, and the stacker returns to the original place after scanning all the documents. |
|
Document support tab |
When you scan documents with U-turn Scan, the support tab holds down the documents that are ejected on the stacker. |
|
|
Feeding section |
Insert a document into the feeding section. |
|
Receipt Guide |
Attach it to the ADF paper chute (cover) for it to be used. If you use the Receipt Guide, you can place documents with different widths such as receipts in it to scan them at the same time. |


-
When carrying the ScanSnap, hold its base and neck. Do not carry the scanner by the head.

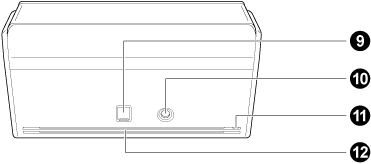
BackSide


No. |
Name |
Description |
|---|---|---|
|
|
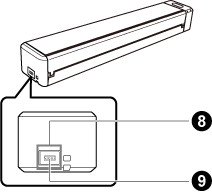
Security cable slot |
Used to connect an anti-theft security cable (commercially available). |
|
|
USB connector |
Slide the cover of the USB connector up to open it and then connect the USB cable to the USB connector. The cover of the USB connector slides up either one or two levels. Open the cover according to the type of the USB cable you have.
Used to connect a USB cable. |
|
|
Power connector |
Used to connect a power cable that is an AC cable which is connected to the AC adapter. Used to connect the AC cable. |
|
|
Tape seal |
Remove this tape seal after installing the software. |
|
|
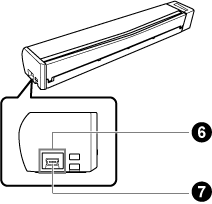
Security cable slot |
Used to connect an anti-theft security cable (commercially available). |
|
|
Power connector |
Used to connect a power cable. |
|
|
USB connector |
Used to connect a USB cable. |
|
|
Ventilation port |
Holes for ventilating hot air from inside the ScanSnap. |
|
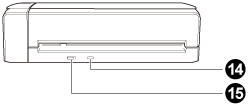
WPS button |
Press this button to connect to a WPS compatible wireless access point by using the push button method. |
|
Wi-Fi switch |
Turn this switch on to use the ScanSnap via Wi-Fi. |
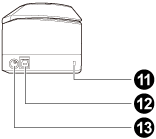
Back

No. |
Name |
Description |
|---|---|---|
|
|
WPS button |
Press this button to connect to a WPS compatible wireless access point by using the push button method. |
|
|
Wi-Fi switch |
Turn this switch on to use the ScanSnap via Wi-Fi. |
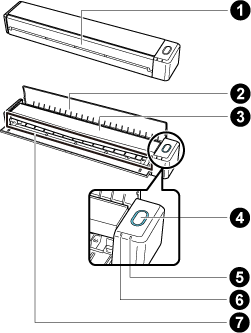
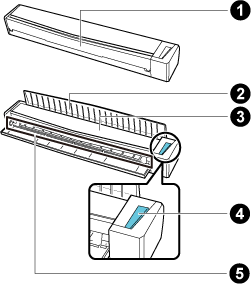
Scanning Unit
Operates when documents are scanned.
No. |
Name |
Description |
|---|---|---|
|
|
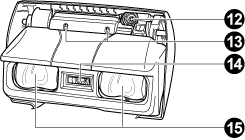
Camera |
Detects page turning and glossy papers. |
|
|
Infrared LED |
Irradiates the scan area with infrared to detect page turning and glossy papers. |
|
|
Glass |
Protects the lens used to scan a document. |
|
|
Lamp |
Illuminates the document to be scanned. |