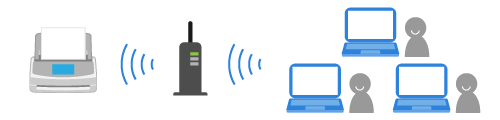
Allowing Multiple Users to Share One ScanSnap Unit
One ScanSnap unit can be used with multiple computers in which ScanSnap Home is installed, by connecting the unit and computers to the same wireless access point. For example, multiple team members in an office can use one ScanSnap unit by connecting their computers to the ScanSnap.
If each member creates a profile in ScanSnap Home, the profiles appears on the touch panel of the ScanSnap. By selecting the profile that you created after loading a document in the ScanSnap, the image created from the document that you scanned is saved automatically to the specified save destination.
Up to 30 profiles can be managed with the ScanSnap. When [All users] is set for [Display of profiles] in the [Settings] screen on the touch panel, the total number of profiles created with all computers connected to the ScanSnap must be within 30.
If the message appears, stating that "Up to 30 profiles can be registered. Delete some profiles.", delete as many profiles as the number of profiles which exceeded the limit in the [Delete a profile] window displayed when you click the [OK] button.
To display only profiles (which were created with the computer that is connected to the ScanSnap) on the touch panel, select [Selected user] or [Connected user] for [Display of profiles] in the [Scanner settings] screen that can be displayed after displaying the [Settings] screen,
For details about methods for changing profiles, refer to Changing Users in order to Display the User's Own Profiles.
- Connect the ScanSnap to a wireless access point.
-
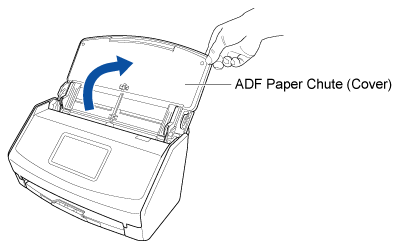
Open the ADF paper chute (cover) of the ScanSnap to turn the power on.
- Press
 in the home screen on the touch panel of the ScanSnap to display the [Settings] screen.
 - Press
 to display the [Wi-Fi settings] screen.
 - Press
 to return to the [Wi-Fi settings] screen.
 - Press to return to the [Wi-Fi settings] screen.
- Press
 to display the home screen.
-
Open the ADF paper chute (cover) of the ScanSnap to turn the power on.
- Check the scanner name of the ScanSnap to be connected.
- Press in the home screen on the touch panel of the ScanSnap to display the [Settings] screen.
- Press
 to display the [Connecting Devices] screen.
 - Check the scanner name that is displayed in [Scanner name].
- Press
- Connect a computer to the ScanSnap.
-
Click the [Scan] button at the top of the Main Window of ScanSnap Home to display the Scan Window.
If the main window is not already displayed, refer to To Display the Main Window.
If the main window is not already displayed, click the [ScanSnap Home] icon
 in the application list that appears when you click Launchpad in the Dock.
-
Click the [Scan] button at the top of the Main Window of ScanSnap Home to display the Scan Window.
Multiple users can share a single ScanSnap unit. All profiles that are managed in ScanSnap Home on the computers connected with the ScanSnap are displayed in the profile list in the home screen on the touch panel.
-
You can also connect the ScanSnap by clicking the [Add] button under [Scanner information] in the [Scanner] tab of the preferences window. To remove the ScanSnap that you do not need, select the ScanSnap from the list of ScanSnap units and click the [Remove] button. It is also removed from the [Select a scanner] list in the scan window.
To display the preferences window, select [Settings] → [Preferences] from the menu.
-
You can also connect the ScanSnap by clicking the [Add] button under [Scanner information] in the [Scanner] tab of the preferences window. To delete the ScanSnap that you do not need, select the ScanSnap from the list of ScanSnap units and click the [Delete] button. It is also deleted from the [Select a scanner] list in the scan window.
To display the preferences window, select [ScanSnap Home] → [Preferences] in the menu bar.