Reconnecting to a Wireless Access Point Using the ScanSnap WPS Button (iX1300 / iX500 / iX100)
If the Wi-Fi indicator lights up or flashes in orange, reconnect the ScanSnap to a WPS compatible wireless access point. The reconnection can be established easily by pressing the WPS button on the ScanSnap.
ATTENTION
Perform the following before you connect using the WPS button.
- If the ScanSnap Wireless Setup Tool is running while the ScanSnap is being connected to the computer with a USB cable, exit the ScanSnap Wireless Setup Tool.
- If scanning is currently being performed from ScanSnap Manager or a mobile device, end the scanning operation.
HINT
Button names and operating procedures may differ depending on the wireless access point. For details, refer to the manual for your wireless access point.
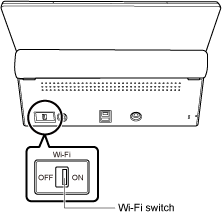
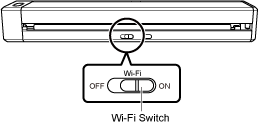
- Turn on the Wi-Fi switch on the back of the ScanSnap.
iX1300

iX500
iX100
- Turn on the ScanSnap.
For details, refer to Turning the ScanSnap On.
- After blinking blue, the Wi-Fi indicator lights up in blue or orange.
- Press the WPS button of the wireless access point.

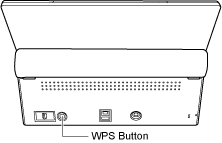
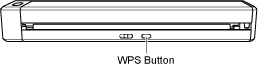
- Press and hold (3 seconds or longer) the WPS button on the back of the ScanSnap within 2 minutes after pressing the WPS button of the wireless access point.
iX1300

iX500
iX100
- The ScanSnap is connected to the wireless access point and the Wi-Fi indicator lights up in blue.
If connection cannot be established, the Wi-Fi indicator blinks or lights up in orange.
ATTENTIONIf you cannot connect the ScanSnap to a wireless access point, refer to "Troubleshooting" in the ScanSnap Manager Help.
HINTFor details about the Wi-Fi indicator status, refer to the following: - The ScanSnap is connected to the wireless access point and the Wi-Fi indicator lights up in blue.