Scanning Documents Using Timed Mode (SV600)
This section explains how to automatically start scanning by setting the time period for the document scanning to start.
- Right-click the ScanSnap Manager icon
 in the notification area, and select [Scan Button Settings] from the Right-Click Menu.
- The ScanSnap setup window appears.
- In the ScanSnap Setup Window, select the [Scanning] tab, and click the [Option] button.
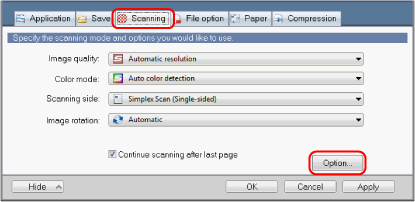
- The [Scanning mode option] window appears.
- Set the time period before the ScanSnap starts scanning a document.
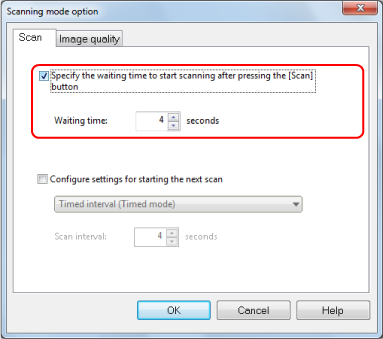
- To set the time period before the ScanSnap starts scanning a document after the [Scan] button is pressed:
Select the [Specify the waiting time to start scanning after pressing the [Scan] button] checkbox, and then specify [Waiting time].
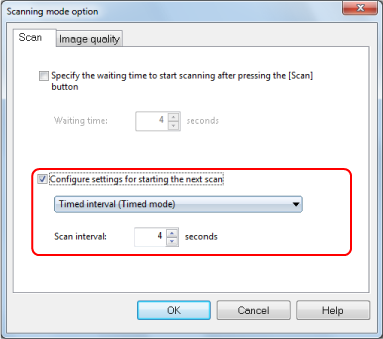
- To set the time period for the ScanSnap to start the next scan when a document is scanned continuously:
- Select the [Configure settings for starting the next scan] checkbox, and then select [Timed interval (Timed mode)].
- Specify [Scan interval].
- To set the time period before the ScanSnap starts scanning a document after the [Scan] button is pressed:
- Click the [OK] button to close all the windows.
- Place a document with the scanned side face-up in the scan area of the ScanSnap.
For details, refer to How to Place Documents (SV600).
- Press the [Scan] button on the ScanSnap.
- Scanning starts after the time period specified in [Waiting time] passes.
- Place the next document to be scanned with the scanned side face-up in the scan area.
For details, refer to How to Place Documents (SV600).
- Scanning starts after the time period specified in [Scan interval] passes.
HINTTo continue scanning, repeat step 7.
- To finish scanning, click the [Finish Scanning] button or press the [Stop] button on the ScanSnap.