Correcting Distorted Book Images (SV600)
To correct the distortion of a scanned image from a book, follow the procedure below.
- To correct the distortion of a scanned image, the shape of the book needs to be detected.
If a book is scanned as follows, the shape of the book may not be detected correctly.
- When a book to be scanned is held down outside of the appropriate areas (Figure 1)
- When a book is scanned without the Background Pad (Figure 2)
- When a book to be scanned is spread open and is placed face-down (Figure 3)
- When a book to be scanned is placed in a vertical orientation (Figure 4)
- When a book that is not rectangular or square is scanned (Figure 5)
- When a book that has a background color other than white (such as a comic magazine) is scanned (Figure 6)
- When a book that has a narrow margin space (such as a catalogue or a magazine) is scanned (Figure 7)
- When a book that is smaller than A5 size (148 × 210 mm/5.83 × 8.27 in.) in a double-page spread is scanned (Figure 8)

- Follow the procedure below to perform multiple book image correction for one page.
- Edit in book image correction mode (
 ).
).- Correcting a distorted book image
- Splitting a double-page spread image
- Edit in point retouch mode (
 ).
).- Filling in the captured fingers in image
If you edit in the book image correction mode after editing in the point retouch mode, the edited results in point retouch mode are overridden.
- Edit in book image correction mode (
- On the window that appears after a book is scanned, select [Correct and save double-page spread document images (book/magazine)] and click the [Check/Correct] button.
For details about how to perform a scan, refer to Scanning Books (SV600).

- The [ScanSnap Manager - Book Image Viewer] window appears.
- Select the page to correct the distortion in [Final image].
- Click .
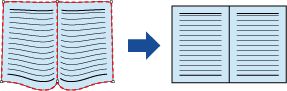
- The shape of the book is automatically detected, and the following items are displayed on the page:
- Corner points
Corner points are displayed around the corners of the book and both ends of the gutter.
- Outline
The shape of the book is indicated with a red dashed outline.
- Corner points
HINTFor the output format selection button, select
 .
. - The shape of the book is automatically detected, and the following items are displayed on the page:
- On the page, drag the corner points to move the corners of the book and both ends of the gutter to any location.
On the front and back cover of the book, make the middle outline for the gutter parallel to the right and left outlines.

If the outline of the book is not aligned with the shape of the book in the scanned image, drag the upper part and lower part of the outline to correct each position.
HINTIf the shape of the book was not detected, the corner points and the outline are displayed on the entire window.
If this is the case, align the corner points and the outline with the shape of the book.

Follow the procedure below to modify the corner points and the outline.
- Modify the corner points.
The corner points can be modified by either of the following:
- Double-click the position where you want to move the corner points.
- The corner points automatically move to the double-clicked position.
If the corner points cannot be modified properly, drag them to move.
- The corner points automatically move to the double-clicked position.
- Drag the corner points to desired positions.
Modify the corner points at both ends of the gutter first and then the corners of the book.
- Double-click the position where you want to move the corner points.
- Modify the outline.
Drag the outline to align it with the shape of the book. If it is hard to align the outline with the shape of the book, position the outline little by little.
To make it easy, click an outline near the corner points and drag and drop the outline to align it with the shape of the book repeatedly.
- Modify the corner points.
- Click the [Apply] button.
- A message for confirming the correction target appears.
- Click the [Selected Pages] button.
- The page distortion is corrected.
When you have completed correcting the page distortion, click the [Save and Exit] button.
HINT- To correct another distorted page, select the page for which the distortion is to be corrected in [Final image], and repeat steps 2 to 6.
- When the text, lines, or graphics in the scanned image are horizontally skewed, clear the [Correct skewed text] checkbox.
When there are curved/slanted lines or graphics with curved/slanted lines on the document, the scanned image of the document may not be corrected properly and the layout may not look right.
- The page distortion is corrected.