Setting Up iX100
Set up the ScanSnap so that it is ready to scan with ScanSnap Manager.
The following preparations are required before you set up the ScanSnap.
- Check that all items are included in the package
For details, refer to Package List for iX100.
HINTWhen Getting Started is included in the package, refer to "Package List" in Getting Started.
- Remove the tape seal (1) and tape (2) from the ScanSnap

- Connect the ScanSnap and the computer with a USB cable, and charge the battery until the battery indicator light turns off
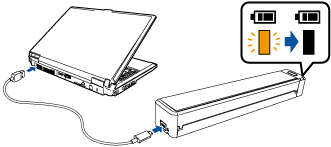 ATTENTION
- Do not open the feed guide until the instructions are displayed on the window for installing software.
- The ScanSnap can be charged with the supplied USB cable or optional USB power adapter. For details about purchasing the USB power adapter, refer to "Suppliers of Consumables/Optional Parts" in About Customer Support and Maintenance.
The procedure to set up the ScanSnap is as follows:
2 Installing the Software/Connecting the ScanSnap
3 Checking the Scanning Operation
![]() Downloading the Software
Downloading the Software
- Turn on the computer and log in as a user with Administrator privileges.
- Access the website "ScanSnap Installer".
- Download [ScanSnap Installer] and save it on your computer.
By using the installer that you downloaded, you can install the following software programs.
- ScanSnap Manager
- ScanSnap Online Update
- ScanSnap manual
Install software applications other than the above if needed.
For the overview for each software program, refer to Overview of the Software Related to the ScanSnap.
![]() Installing the Software/Connecting the ScanSnap
Installing the Software/Connecting the ScanSnap
- Run the installer that you saved on your computer.
- Follow the instructions on the [ScanSnap Installer] window that appears.
When you are asked whether you accept the license agreement terms, read the confirmation message and select [I agree to all terms and conditions].
- When [Installation complete] appears, click the [Complete] button.
- When the [About ScanSnap's Auto Power OFF function] window appears, read the message and click the [Next] button.
- Follow the instructions on the [ScanSnap - Connecting the ScanSnap] window to connect the ScanSnap to a computer.
- On the [ScanSnap wireless network setup] window, select whether to configure the wireless settings in order for the ScanSnap to be connected to a wireless LAN.
If you want to configure the wireless settings, click [Setup now] and follow the instructions on the window that appears.
If you do not want to configure the wireless settings, click the [Later] button. When you connect the ScanSnap to a wireless LAN later, refer to Connecting the ScanSnap via Wireless LAN (iX1300 / iX500 / iX100).
- If there are available updates for ScanSnap Online Update on the server, you will be asked whether you accept the license agreement terms for ScanSnap Online Update.
For details about ScanSnap Online Update, refer to the ScanSnap Online Update Help.
- To save images created from documents that you scanned with the ScanSnap to a mobile device or a cloud service directly, you need to connect the ScanSnap to the mobile device or the ScanSnap Cloud server.
For details, refer to Connecting the ScanSnap to a Mobile Device or the ScanSnap Cloud Server (iX1600 / iX1500 / iX1300 / iX500 / iX100).
![]() Checking the Scanning Operation
Checking the Scanning Operation
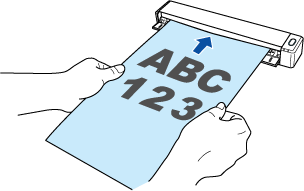
- Insert a document in the ScanSnap.
Insert a document straight into the feeding section of the ScanSnap, with the scanning side facing up.
For details about how to scan a document, refer to Scanning Documents with iX100.
- Press the [Scan/Stop] button to start scanning.
To continue scanning, insert the next document to be scanned. When the document is inserted, scanning starts automatically.
When the scanning of documents is complete, press the [Scan/Stop] button to finish scanning documents.
![Pressing the [Scan/Stop] Button](images/scan_paper_ix100.png)
Once the Quick Menu for selecting an application to perform a particular action appears, the check process for the scanning operation is complete.
Clicking an icon on the Quick Menu allows you to save images created from documents that you scanned with the ScanSnap to your desired folder, or attach them to an e-mail.