Scanning Documents (SV600)
- Press the [Scan] or [Stop] button on the ScanSnap to turn the power on.
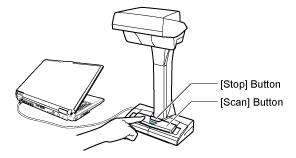
- The power LED lights up in blue.
In addition, the ScanSnap Manager icon in the Dock changes from
 to
to  .
.
- The power LED lights up in blue.
- Place the Background Pad on the front side of the ScanSnap.
Place the Background Pad so that it is in contact with the ScanSnap.
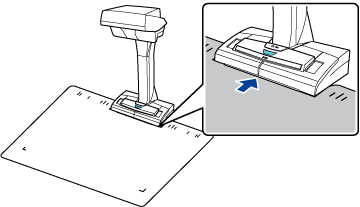
- Place a document in the scan area of the ScanSnap and press the [Scan] button.
For details, refer to Documents to Scan (SV600).

- Scanning starts.
ATTENTION- Do not perform the following operations during scanning. Doing so will stop scanning.
- Connect or disconnect the ScanSnap and other USB devices.
- Switch users.
- Allow the computer to enter sleep mode.
- Do not cover the white sheet with an object or hand during scanning. The color reproducibility of the scanned image will be affected.
- Do not shake the table or desk when the ScanSnap is being used or move the documents while they are being scanned. Doing so may distort the scanned image or blur the color.
HINTYou can also start scanning a document by clicking the ScanSnap Manager icon
in the Dock while holding down the [control] key on the keyboard and then selecting [Scan] from the ScanSnap Manager Menu.- The power LED on the ScanSnap flashes in blue while the documents are being scanned.
The [ScanSnap Manager - Image scanning and file saving] window appears.
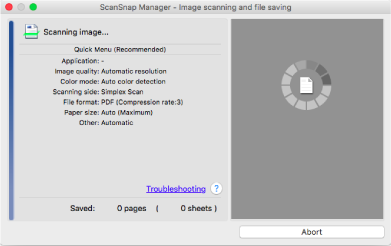
- When scanning is complete, the [ScanSnap Manager - Image scanning and file saving] window displays a scanning standby status.
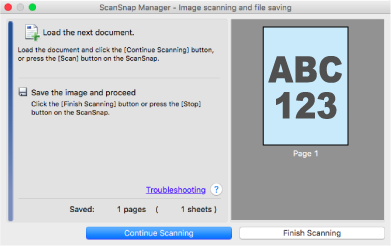
HINTTo continue scanning, place down the next document to be scanned, and then perform one of the following operations. Continuous scanning starts.
- Clicking the [Continue Scanning] button in the [ScanSnap Manager - Image scanning and file saving] window
- Pressing the [Scan] button on the ScanSnap
- To finish scanning, click the [Finish Scanning] button or press the [Stop] button on the ScanSnap.
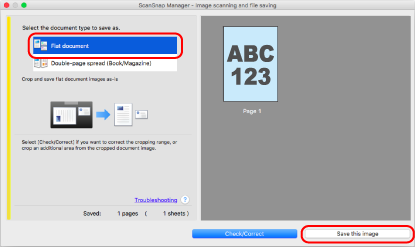
- A window is displayed for selecting how to save the scanned images.
In the preview area, the scanned images are cropped and displayed.
- A window is displayed for selecting how to save the scanned images.
- Select [Flat document], and then click the [Save this image] button.
 HINT
HINTClick the [Check/Correct] button in the [ScanSnap Manager - Image scanning and file saving] window to correct the scanned image. The following functions are available:
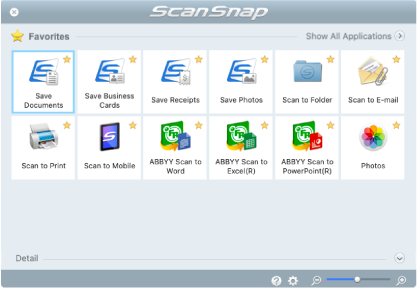
- The Quick Menu appears.
- In the Quick Menu, click the icon of the application to link with ScanSnap Manager.
When you select [Save Documents], you can manage scanned images by folder with ScanSnap Home.
For details, refer to Managing Paper Documents by Folder on a Computer.
- The selected application starts up. For details, refer to the Advanced Operation Guide.
ATTENTION- You cannot start scanning when the Quick Menu is displayed. Either select an icon from the Quick Menu and finish the process, or close the Quick Menu before you perform the next scan.
- Do not move, delete, or rename scanned images using other applications while the Quick Menu is displayed.
HINT- Clicking
 displays the description of an application. Placing the mouse cursor over the icon of another application displays the description of the application.
 - Performing a scan while an application that can be automatically linked with is active automatically starts the linkage between ScanSnap Manager and the application.
For details, refer to the Advanced Operation Guide.