Scanning Documents Larger than A4 or Letter Size with the Carrier Sheet (iX1300)
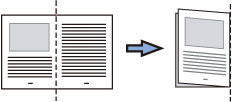
Documents larger than A4/Letter size (such as A3, 11 × 17 in. and B4) can be scanned with the optional Carrier Sheet. By folding the document in half and scanning in duplex mode, the two sides are merged into a single image.
- The Carrier Sheet is only available for Return Scan, in which a document is inserted into the manual feeder and scanned.
For details about documents that can be scanned with Return Scan, refer to Documents to Scan (iX1300).
The [Deskew by text on document] checkbox in the [Scanning mode option] window will be disabled.
To open the [Scanning mode option] window, click the [Option] button in the [Scanning] tab of the ScanSnap Setup Window.
Both sides of a double-sided A4/Letter size document or smaller can also be scanned and merged into a single image.
- Click the ScanSnap Manager icon
 in the Dock while holding down the [control] key on the keyboard, and then select [Settings] from the ScanSnap Manager Menu.
- The ScanSnap setup window appears.
- In the [Paper] tab, select [Automatic detection] in [Paper size], and then click the [Carrier Sheet Settings] button in [Manual feeder] (Return Scan).

- The [Carrier Sheet Settings] window appears.
- Select [one double-page spread image] in [Save as] and click the [OK] button.

- In [Scanning side] in the [Scanning] tab, select [Duplex Scan (Double-sided)] and click the [Apply] button.
 ATTENTION
If [Simplex Scan (Single-sided)] is selected, the ScanSnap outputs the same result as performing a simplex scan in [two separate images (front and back)] mode.
- Click the [
 ] button in the upper left of the window to close the ScanSnap setup window.
 - Place the document inside the Carrier Sheet.
- Fold the document in half with the sides to be scanned facing out.
Fold it tightly and smooth out any creases.
- Open the Carrier Sheet to bind the document.
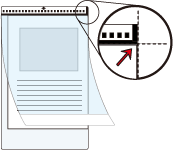
Align the fold line with the right edge of the Carrier Sheet so that the document fits in the upper right-hand corner of the Carrier Sheet.
 HINT
HINTNote that the front side of the Carrier Sheet has a black and white pattern at the top and a thick vertical line in the upper right-hand corner.
- Fold the document in half with the sides to be scanned facing out.
- Insert the part with the black and white pattern straight into the manual feeder, with the front side of the Carrier Sheet facing up.
Make sure that the Carrier Sheet is fed into the ScanSnap and is held firmly.
 ATTENTION
When you scan a document, the document comes out from the back of the ScanSnap.
Leave space (about the length of the Carrier Sheet) at the back of the ScanSnap.
HINTYou can scan a document with the ADF paper chute (cover) closed.
- Press the [Scan] button on the ScanSnap to start a scan.ATTENTION
If the Carrier Sheet is inserted into the manual feeder in a skewed way, the message "The inserted document is skewed. If the document is scanned in the current condition, it may be damaged." may be displayed.
Remove the Carrier Sheet, insert it into the manual feeder in a straight direction, and then click the [Continue Scanning] button or press the [Scan] button on the ScanSnap.
To prevent the message from being displayed, clear the [Scanning will not start if the inserted document is skewed] checkbox in the [Feed option] window.
- In the following cases, the message "Documents have been loaded in the ADF paper chute (cover) and inserted into the manual feeder at the same time." is displayed.
- Pressing the [Scan] button on the ScanSnap while documents are loaded in the ADF paper chute (cover) and a document is inserted into the manual feeder at the same time
Remove the documents from the ADF paper chute (cover) and then click the [Continue Scanning] button or press the [Scan] button on the ScanSnap.
- A document getting jammed in the ScanSnap
Refer to How to Remove a Jammed Document from iX1300 to remove the jammed document.
Load documents in the ADF paper chute (cover) or insert a document into the manual feeder again and then click the [Continue Scanning] button or press the [Scan] button on the ScanSnap.
- Pressing the [Scan] button on the ScanSnap while documents are loaded in the ADF paper chute (cover) and a document is inserted into the manual feeder at the same time
- A document cannot be inserted into the manual feeder during U-turn Scan.
- When there are no documents in either the ADF paper chute (cover) or manual feeder, the message "Documents have not been loaded in the ADF paper chute (cover) or inserted into the Manual Feeder." is displayed. Insert a document into the manual feeder and then click the [Continue Scanning] button or press the [Scan] button on the ScanSnap.
- Do not perform the following operations during scanning. Doing so will stop scanning.
- Connect or disconnect the ScanSnap and other USB devices.
- Close the ADF paper chute (cover).
- Switch users.
- Allow the computer to enter sleep mode.
- The [Scan] button on the ScanSnap flashes in blue and the [ScanSnap Manager - Image scanning and file saving] window appears while the document is being scanned.
Both sides of the document are scanned and displayed as a single double-page spread image in the preview area.

To continue scanning, insert the next document to be scanned. When the document is inserted, scanning starts automatically.
- Click the [Finish Scanning] button in the [ScanSnap Manager - Image scanning and file saving] window or press the [Scan] button on the ScanSnap without loading any more documents in the ScanSnap.
- The scanned images of the front and back sides of the document are saved as a double-page spread image.
- There may be a line or a gap appearing between the front and back side images. Also when you scan a thick document in the Carrier Sheet, the scanned image on the left and the scanned image on the right of a double-page spread image may skew towards each other from the top.
These symptoms may be improved when you place the document in the Carrier Sheet as follows:
- Fold the document properly
- Neatly align the edges of the document with the edges of the Carrier Sheet
- Turn over the Carrier Sheet to the other (reverse) side
- If [Automatic detection] is specified for [Paper size] in the [Carrier Sheet Settings] window, an optimal size will be selected automatically from the available standard sizes (A3, B4, or 11 × 17 in.) in [Paper size]. Note that the size of the image may become smaller than the original document depending on the document.
Example: When characters and illustrations are printed to fit in A4 size in the center of an A3 size document, the scanned image is output in B4 size. To output the scanned image in its original size, specify the document size in [Paper size].
- Part of the scanned image around where the document is folded may appear missing. In that case, place the document so that its edge is about 1 mm (0.04 in.) inside from the edge of the Carrier Sheet.